How to Create Your Baseline Resume

Writing a resume is a dreary task. Most people loathe it, but you have to do it if you want to get a job. It is incredibly overwhelming if you have not looked for a job for a while or you are a graduate student about to graduate. There are many reasons why writing a resume is one of those things we procrastinate with, such as:
- It takes time – you must remember your accomplishments in your last three jobs.
- It is emotional – you may fear not having enough substantial accomplishments.
- It is challenging to decide what to prioritise – you may have a lot of experience and now must determine what experience to prioritise.
- It is challenging to describe accomplishments succinctly
If you don’t have a systematic way to deal with all these, it can be an overwhelming process that could take weeks, even months, until you build your resume.
What you need is a structured and efficient approach that you can follow to get through this painful task. And this guide does exactly that. It details a step-by-step process to write your baseline resume in just a few hours.
Baseline Resume
Every resume you submit to apply to a job requires re-touching your resume to customise your experiences to match the requirements and language of the target job description.
Therefore, creating a resume to which you only need to make quick edits to customise to different jobs will save you a lot of time. This is what a baseline resume is.
We will show you how to create your baseline resume. The goal is to create a resume that includes your job experiences that meet frequently listed job requirements across multiple job listings for the job title you are applying for. This will ensure that your resume covers the basics of all jobs for the same job title you want to apply. And then, every time you apply to a specific job, you only need to edit your resume to target the requirements that are specific to that company.
Creating a Baseline Resume
A product manager’s responsibilities centre around six core functions:
- Vision/strategy/execution,
- User experience,
- Market research,
- Communications,
- Analytics,
- And technology.
Your baseline resume should show experience covering these functions as much as possible. Here is a summary of the steps to build a baseline resume, followed by the detailed sections.
In a nutshell, the first two steps generate a list of frequently used keywords/phrases in the job requirements section of job listings. You will repurpose these keywords/phrases in your resume to match the general job requirements companies are looking for.
In the third step, you will write a description of your past experiences for each job.
In the fourth step, you will transform your descriptions into the preferred format for a resume, RAP (result, action, problem) or APR (action, problem, result). You will also check if you should combine experiences that make up for a more substantial accomplishment or break down experiences if they involve multiple accomplishments.
In the fifth step, you will check again if you need to further the bullet points describing your experience. And in the sixth and final step, you will transfer your experience bullet points to your resume template. In summary, the steps are:
- Step 1: Breakdown job listings requirements into product management functions
- Step 2: Find keywords
- Step 3: Write and categorise your work experience
- Step 4: Rewrite your experience in RAP or APR format using the keywords
- Step 5: Optimise
- Step 6: Build your resume
Step 1: Breakdown Job Listings Requirements into PM Function Categories
The objective is to generate a list of keywords/phrases you will repurpose to write your job experience to match common skills and experiences of target job listings.
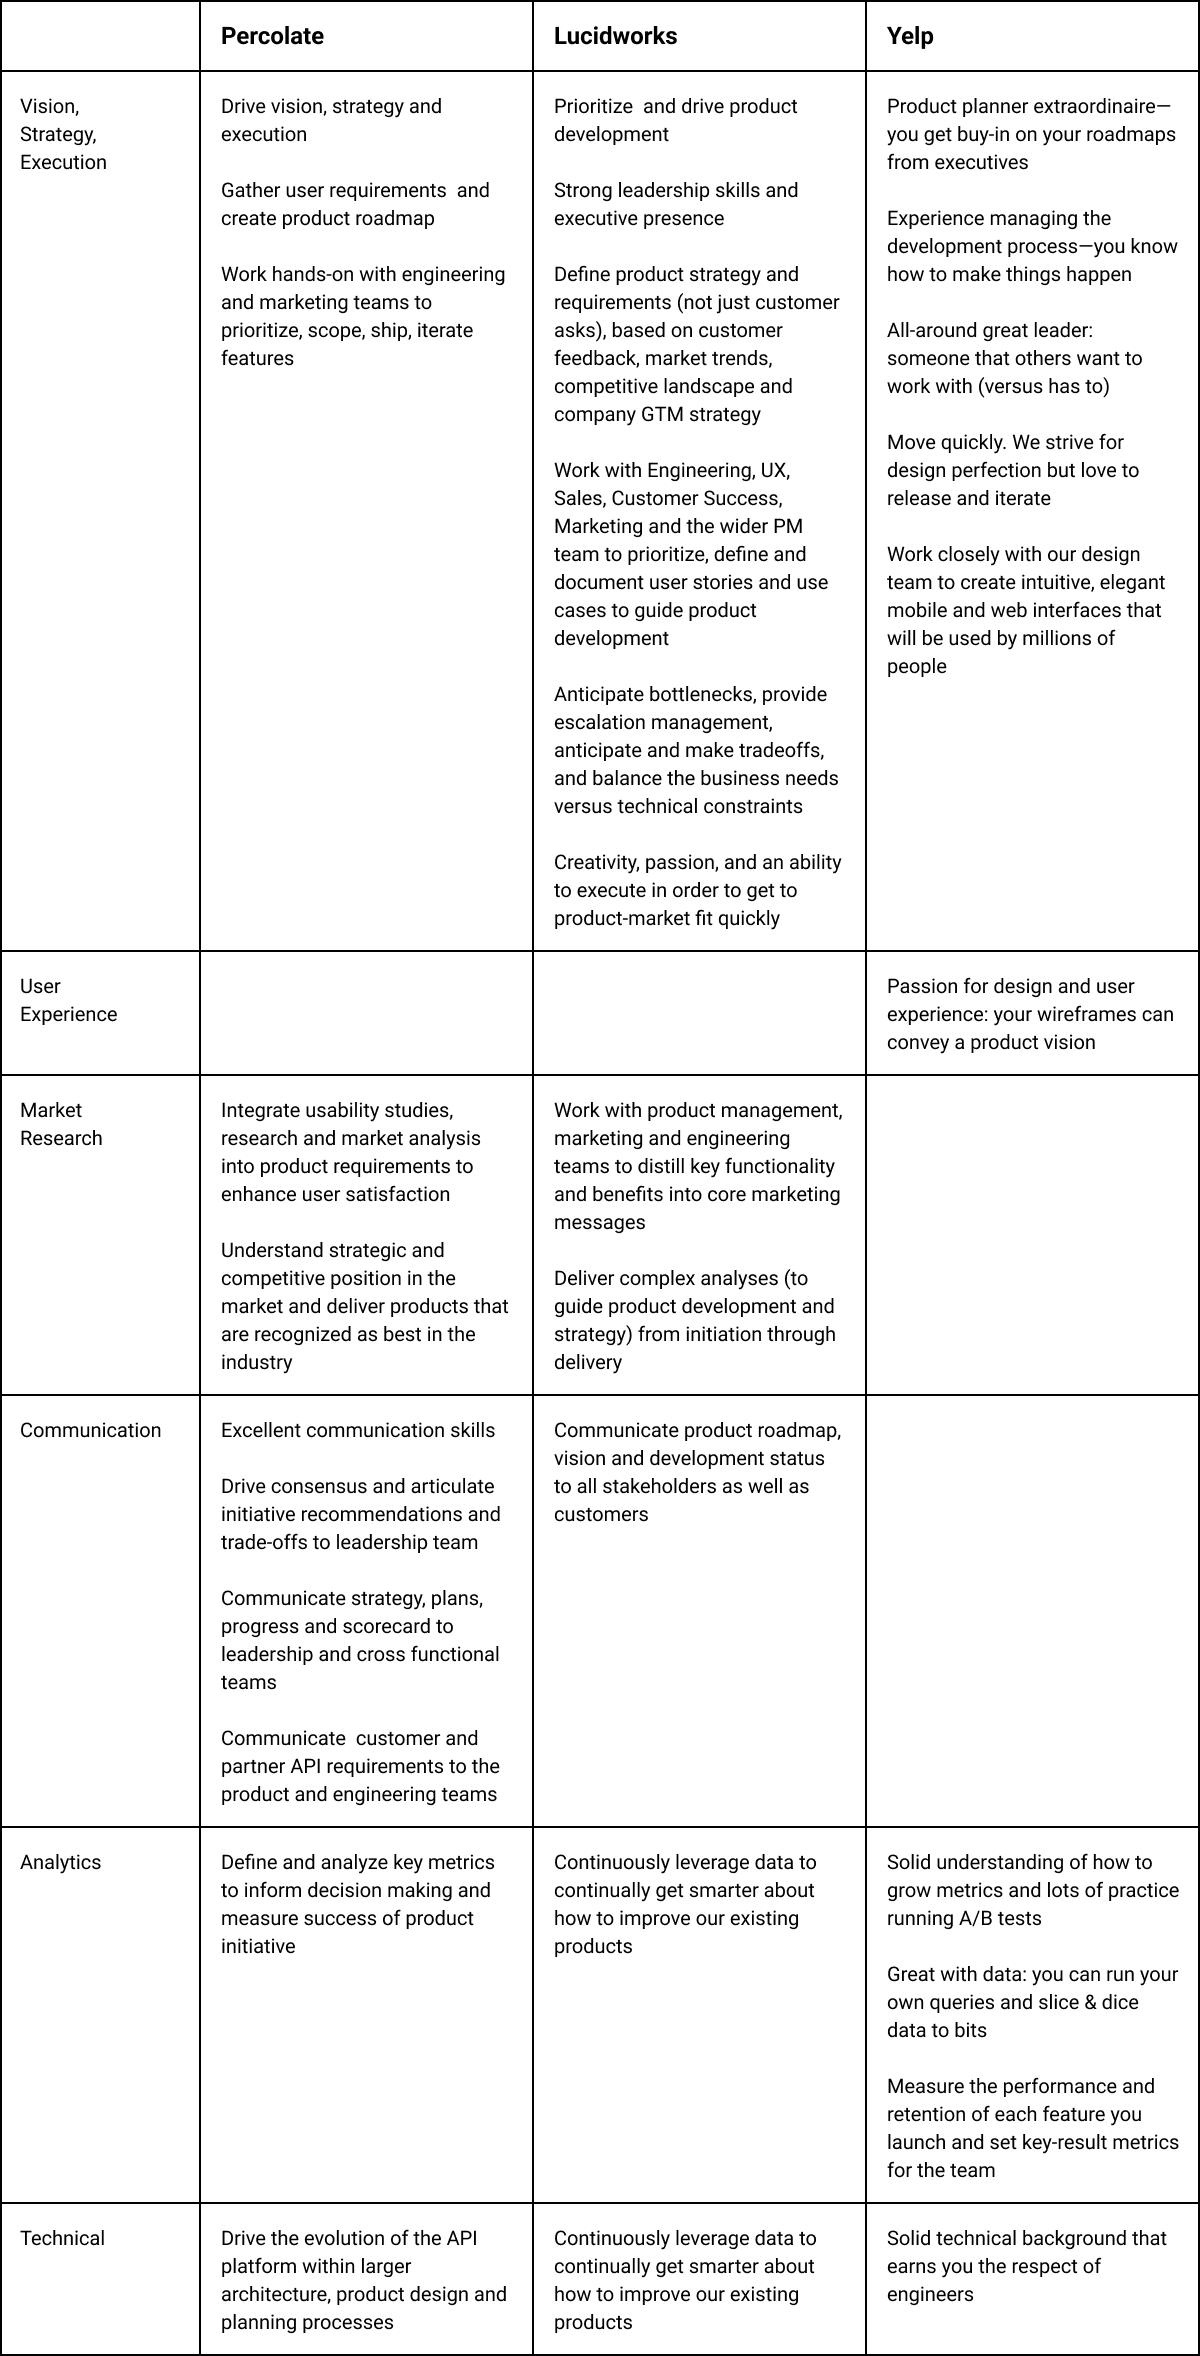
Locate three job postings that appeal to you. Copy the sentences listed in the “Job Responsibilities” section for each posting and allocate them to one of the six product management functions listed in the Creating a Baseline Resume section.
To illustrate this, Table 1 showcases three columns, each representing a company (Percolate, Lucidworks, and Yelp) and six rows representing a product management function. Each cell encapsulates keywords/phrases extracted from those companies’ job postings related to the appropriate product management function, such as:
- Vision, Strategy, Execution
- User Experience
- Market Research
- Communication
- Analytics
- Technical
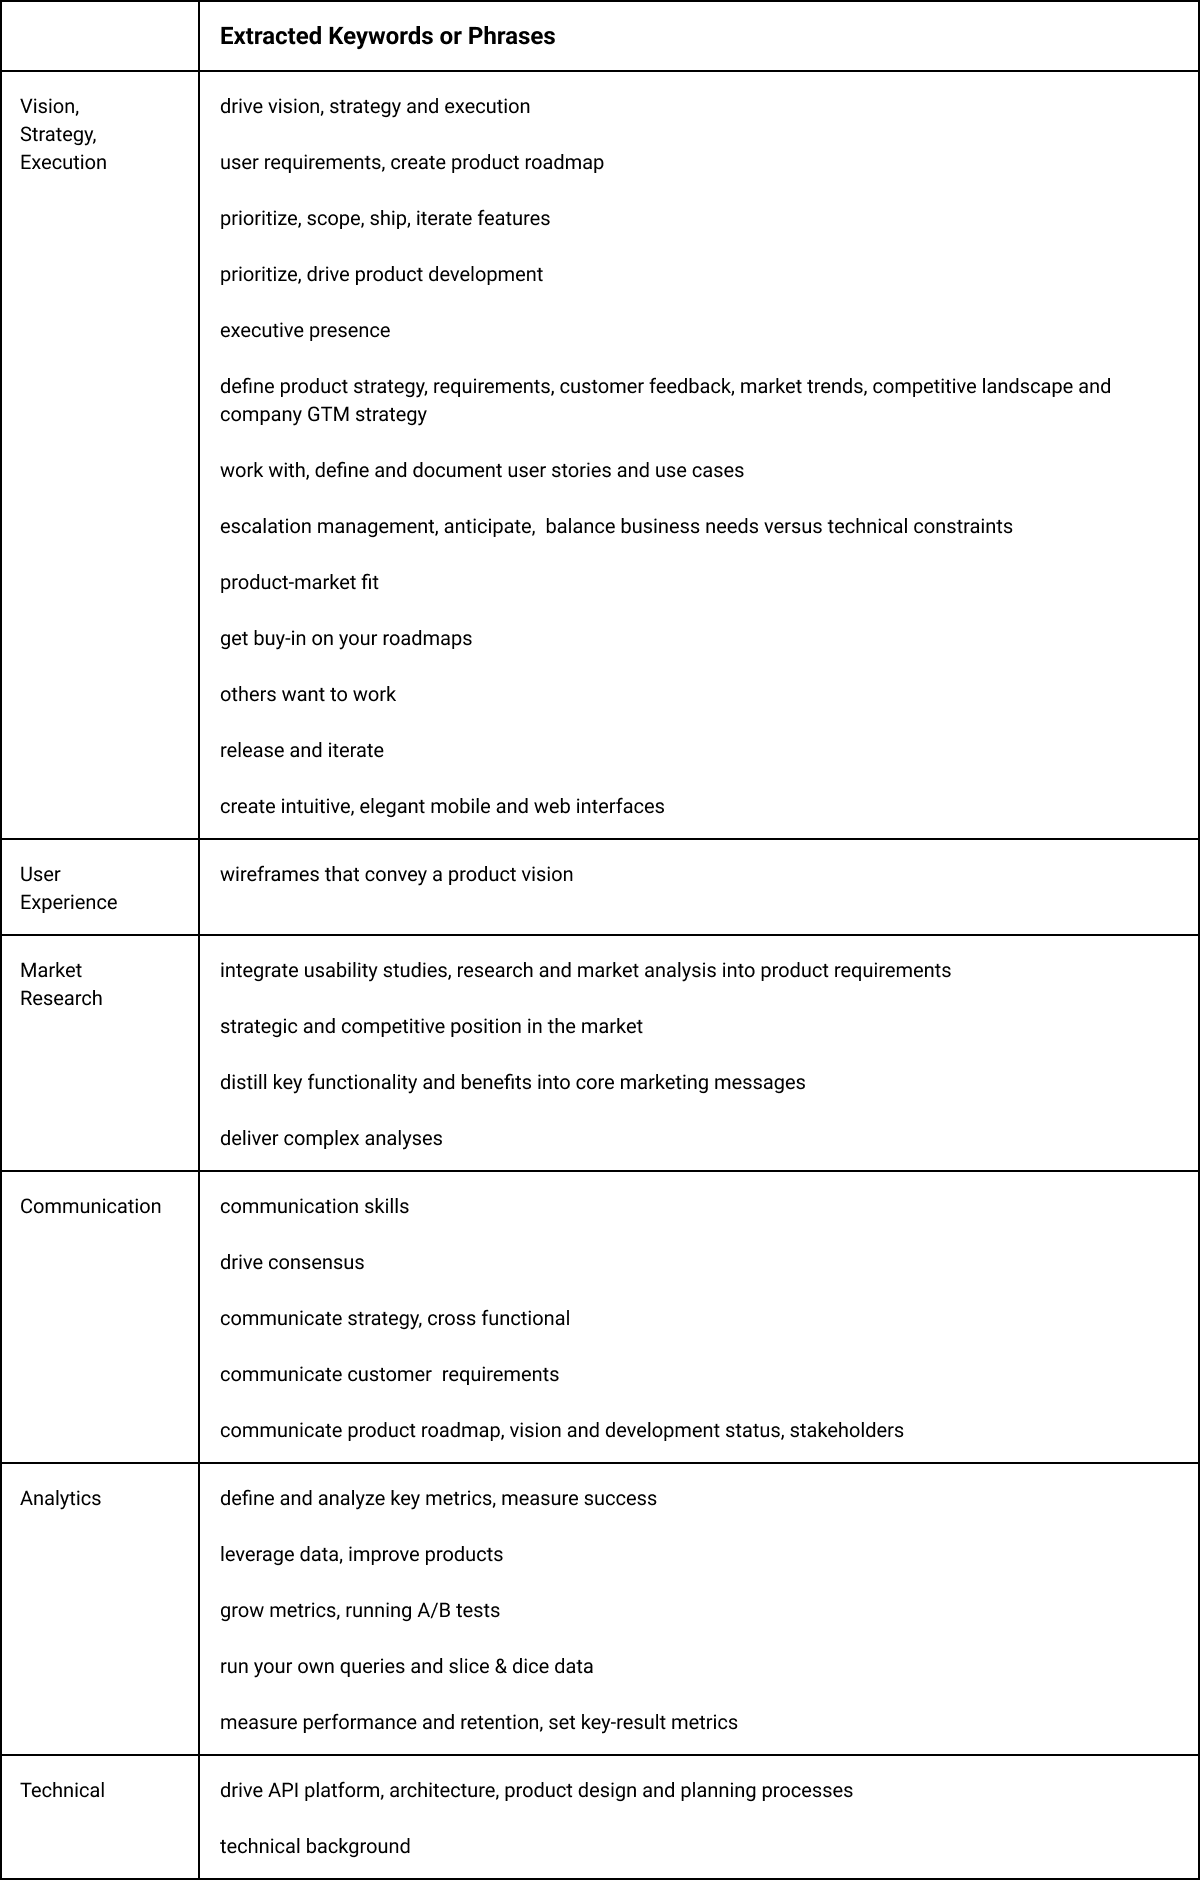
Step 2: Find Keywords
Extract and group keywords/phrases associated with a specific Product Management function from each cell under each company column from the previous table. The result is shown in the next table, Table 2.
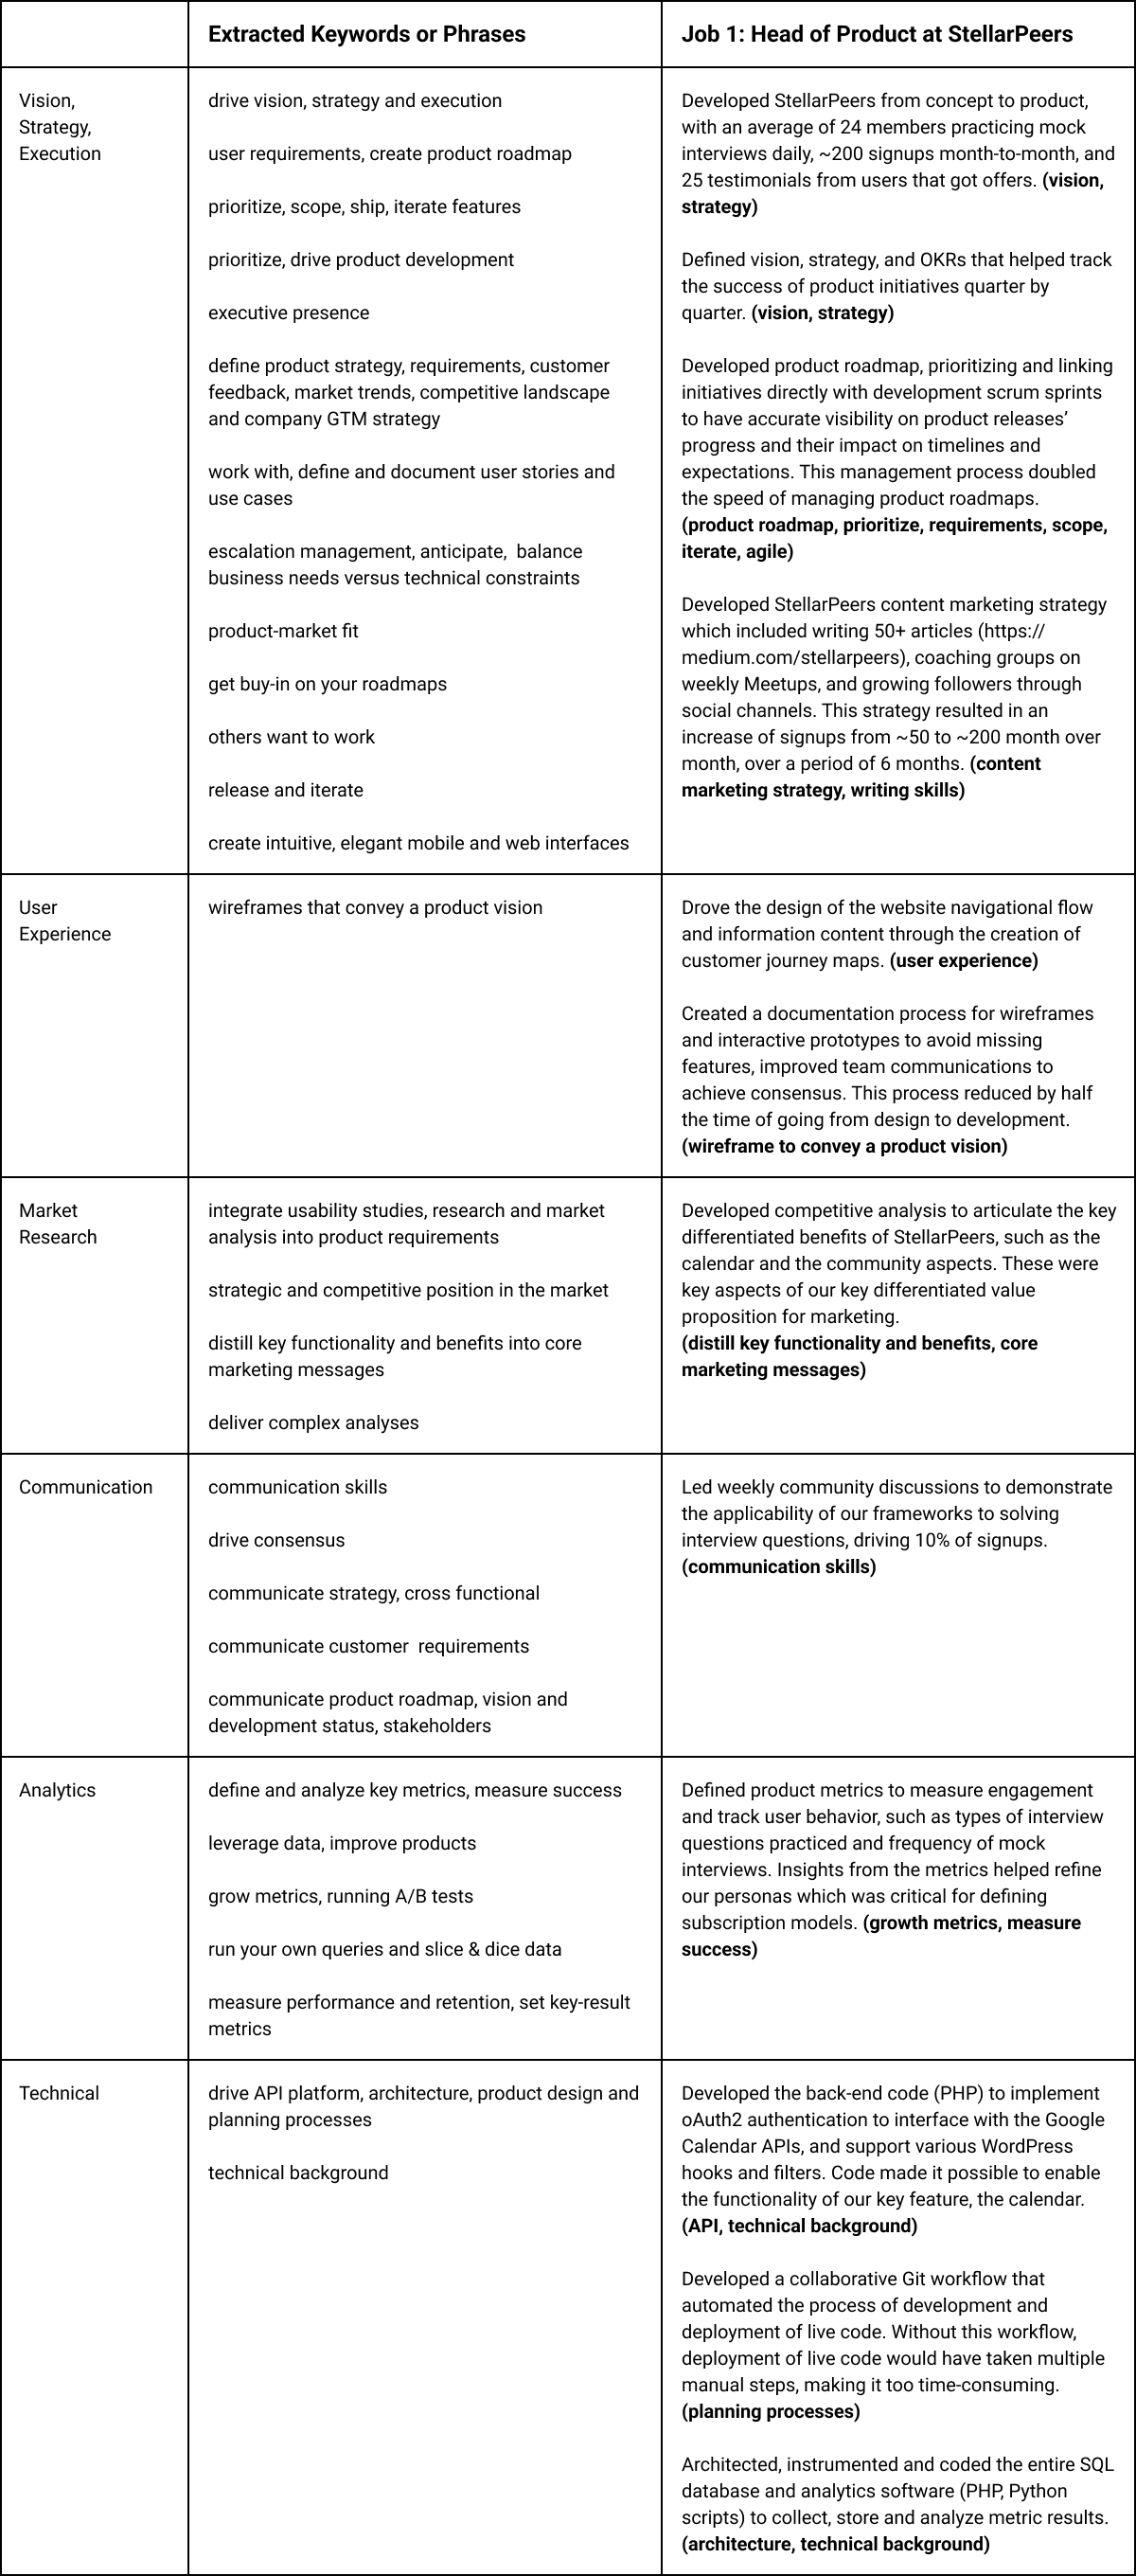
Step 3: Breakdown Your Work Experience into PM Function Categories
For each job you had in the last ten years, write sentences describing your principal achievements related to one or more product management functions. The table below, Table 3, shows an example. The second column (Job 1: Head of Product at StellarPeers) shows achievements for one job across all six product management functions (rows); do the same for all the jobs you want to include in your resume. At the end of each sentence, list any keywords extracted from the job postings in Step 2 that may relate to the sentence. To help contrast your sentences with the keywords, it helps to display them side by side, like in column 1 of Table 3.
Typically, recruiters are only interested in your most recent work experience (within the last decade) and may overlook older roles. Therefore, spend most of your time on job experiences in the last ten years. We recommend you summarise your experience in older jobs in an “Additional Experience” section.
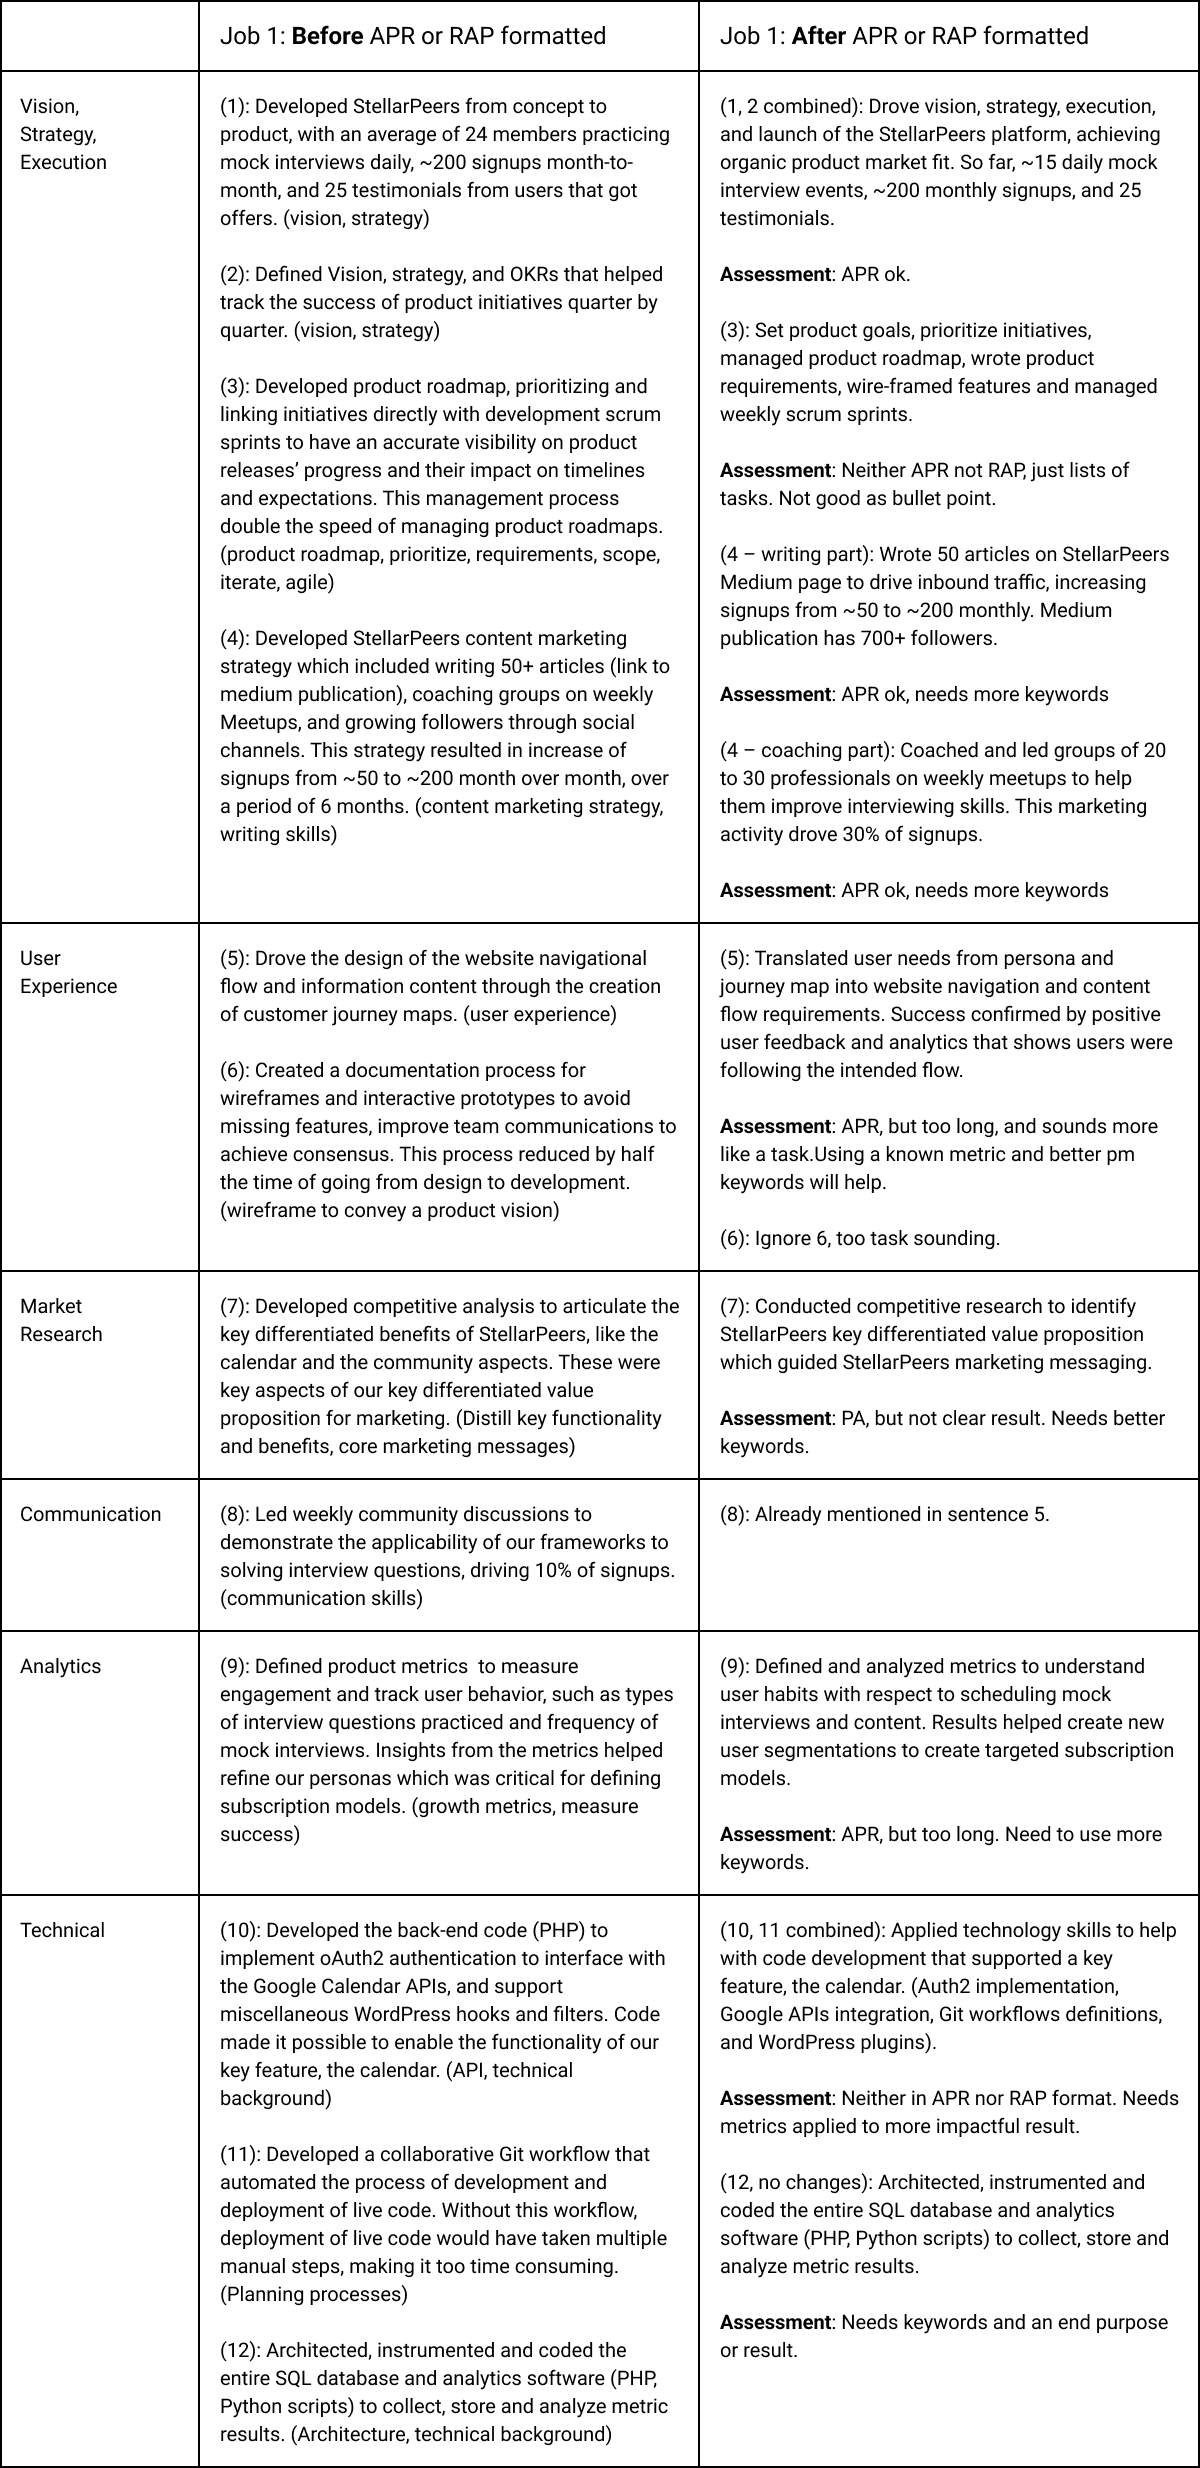
Step 4: Rewrite Your Experience in RAP or APR Format Using the Keywords
Some sentences may be about the same activity, and it may be better to merge them to avoid repetition. Or a sentence may talk about two different outcomes, and it is better to split them. After merging or splitting your sentences, rewrite them in RAP or APR format. Use the RAP format as much as possible because starting your sentences with the result is more powerful. Use the keywords you extracted from the job descriptions as much as possible in your sentences.
These steps summarise the process:
- Combine sentences about the same accomplishment and split sentences that mention more than one accomplishment.
- Rewrite the sentences into RAP or APR format. Utilise as many of the keywords you had previously extracted in Step 2, as much as possible.
- Evaluate whether your new APR/RAP bullet points can use additional keywords.
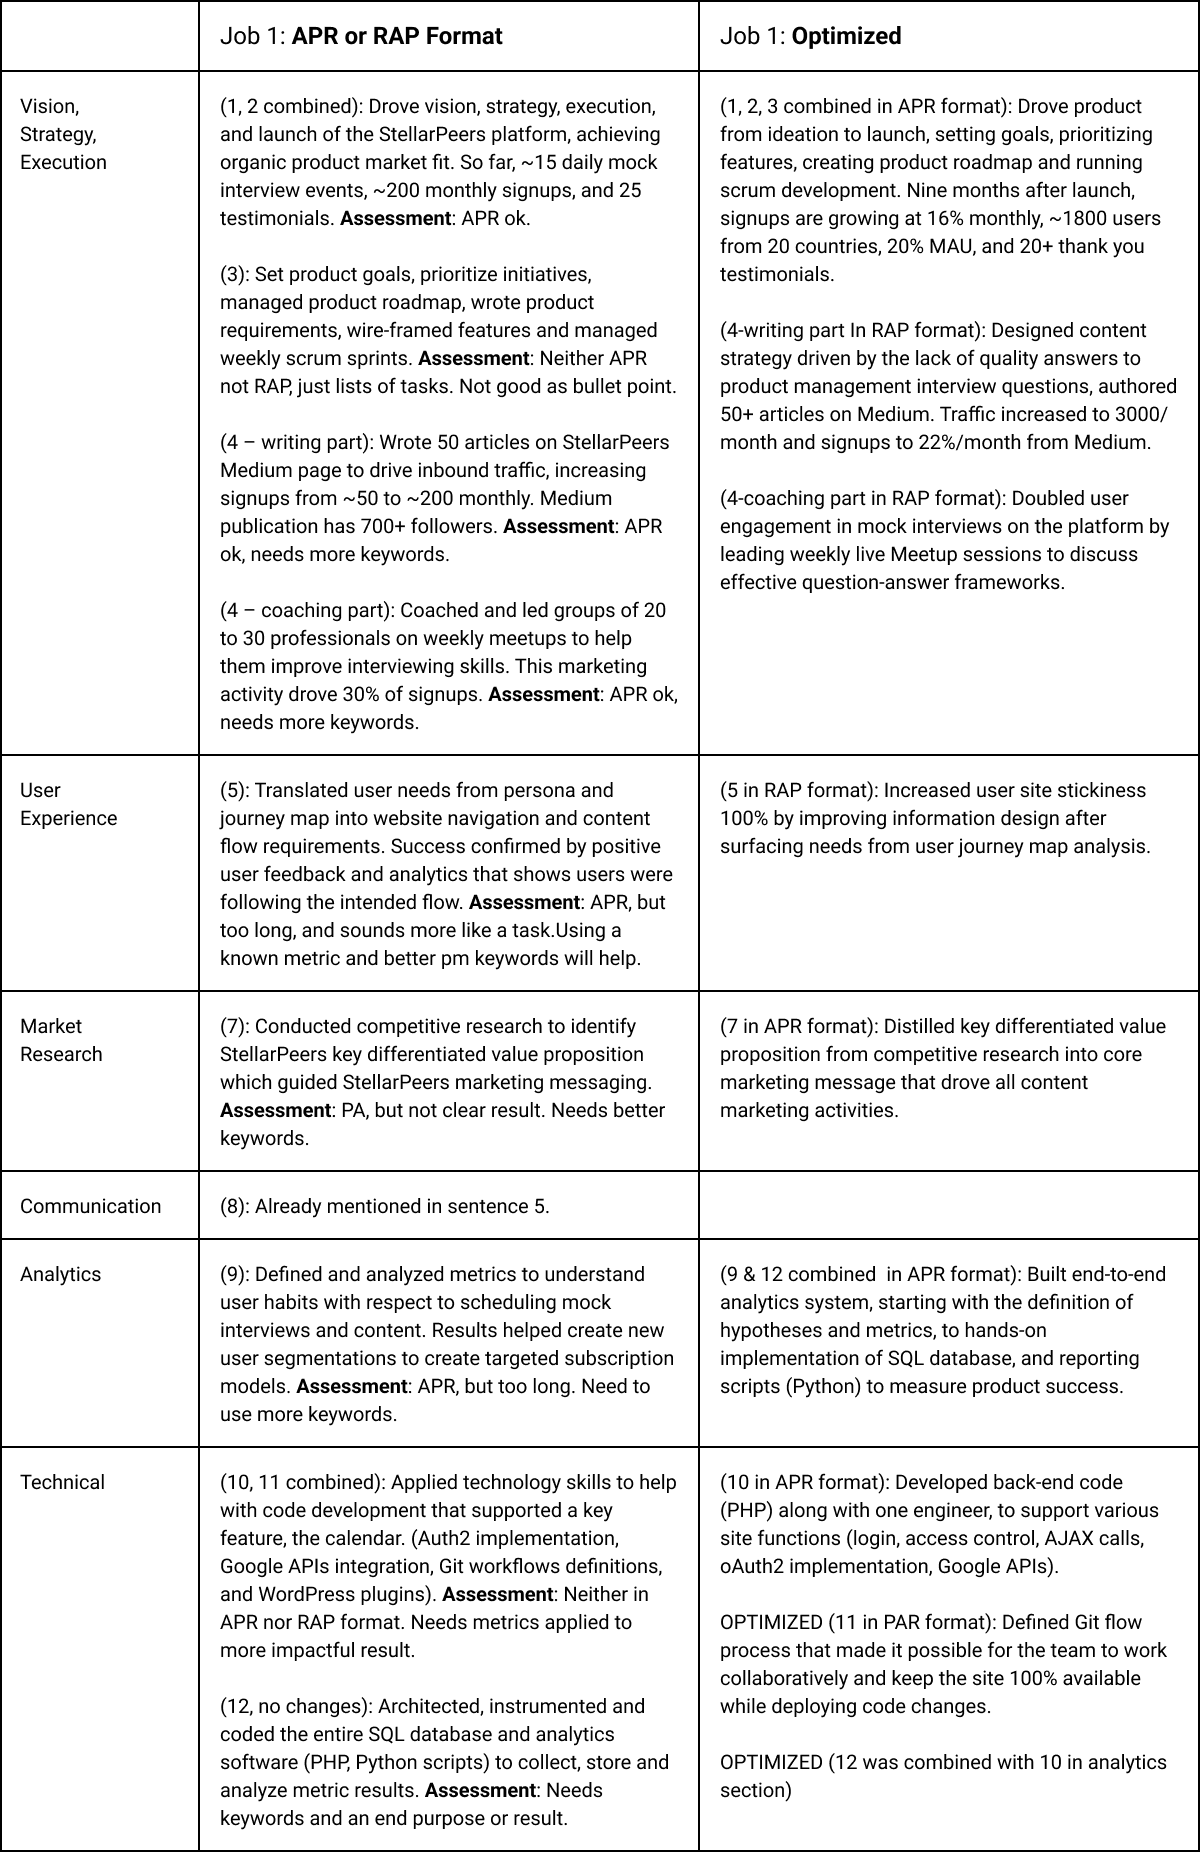
The table below illustrates how the bullet points in the first column are merged or split to improve them. The result of the optimization is in the second column.
Step 5: Optimise
Again, evaluate whether one or more experiences must be combined or split. Combine them if the experiences are about the same activity. Split an experience if it has two or more separate outcomes. Try to shorten long sentences. Check if you can replace words with keywords or phrases from Step 2.
Repeat Steps 1 and 5 for each job experience you want to showcase on your resume.
The following table. Table 5, displays the before and after optimization of the experiences for the person’s first job.
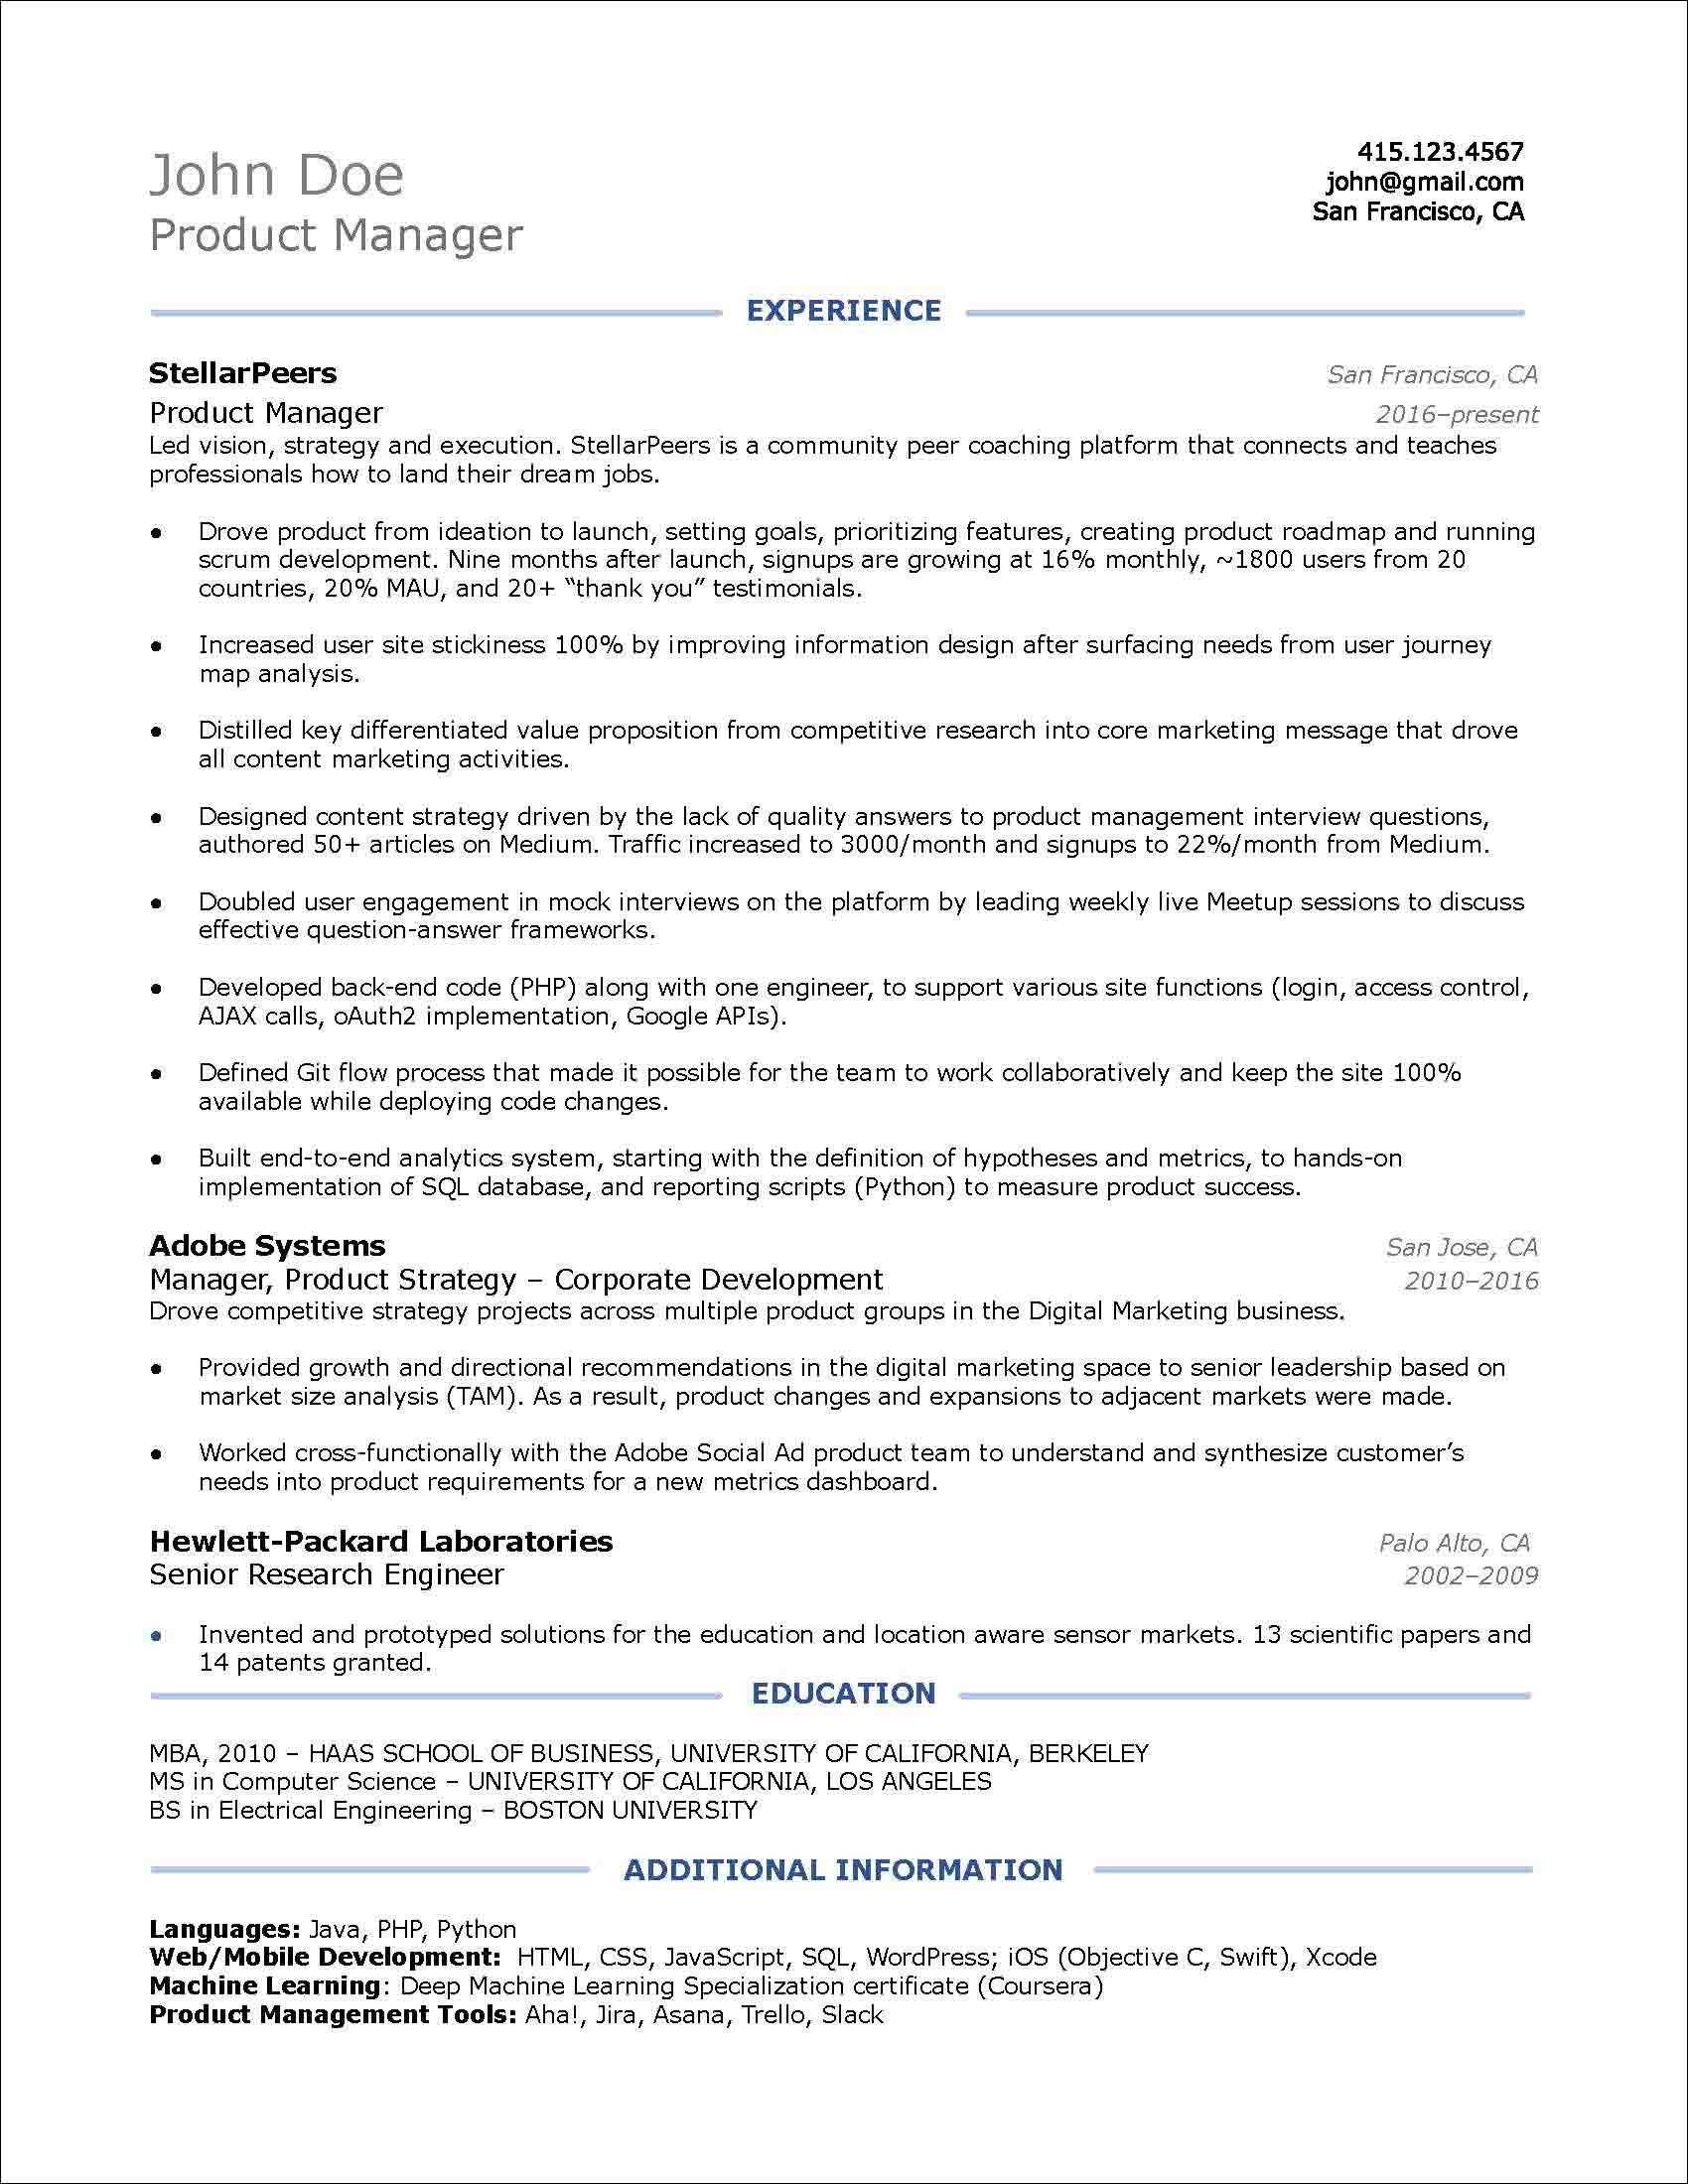
Step 6: Build Your Resume
It is time to put your resume together. You can create your own template using Microsoft Word or buy one from one of the several resume builder products on the market (e.g., MyPerfectResume.com, ResumeNow.com, etc.).
If you like to design your own, we recommend following the design guidelines in Resume Formatting Tips.
Add your optimised sentences to your resume template.
Below is the final version of the resume we built in this article after various iterations.
Tips
Final advice before submitting your resume:
- Try to fit your resume into one single page. It is well known that recruiters avoid long resumes. They only spend 6 seconds browsing one.
- Only include jobs within the last 10 to 15 years.
- Only include jobs that are very relevant to the target job.
- Add a skills section highlighting only skills that are very relevant to the target job.
Conclusion
Writing a resume is a dismal task. A baseline resume makes applying to multiple job listings easy and quick. This guide shows you how to create one step-by-step in a short time so that you can move on to the most exciting part: applying for jobs!